Table of Contents
Appendices
|
Product Note:
The types of 3D file formats that you will be able to save
depends on the edition of quick3D you are using.
more information: Product
Info |
 1. Loading and Saving Files 1. Loading and Saving Files |
 |
1.1 - Loading
Files
There are five ways to open a 3D file in quick3D. Appendix A lists supported file format types.
- Select Open... from the File menu, and use the
standard Windows file open dialog that appears.
- Double-click a supported file. This will load quick3D
automatically if you have used quick3D's configuration wizard (see
Chapter 6) to associate the file's type
with quick3D.
- Drag a supported file into quick3D's window.
- Select a file from one of the Recent menus from the
File menu. Your ten most recently loaded 3D files are stored
in the Recent Reads menu. Conversely, your ten most recently
saved 3D files are stored in the Recent Writes menu. This
allows you to quickly get back to previously opened and converted
files.
- Use quick3D's File Browser. The File Browser has its own window
that "docks" to the quick3D window. You can display it by selecting
Open File Browser... from the File menu. The File
Browser is similar to the Windows Explorer, and lets you navigate
your drives for files. Supported files are displayed with icons
that represent their 3D file type.
1.2 - Saving Files
There are three kinds of files you can save:
- 3D format files
- Image format files
- HTML files.
To save as a 3D file, select Save As... from the File
menu. In the window that appears you can select the filename,
directory, and 3D file type to save as (see Appendix A).
To save an image file, select Export 2D Image... from the
File menu. In the window that appears you can select the
filename, directory, and 2D file type to save as (see Appendix A). This will save an image of the
current display (you can also export an image using the Copy to
Clipboard command).
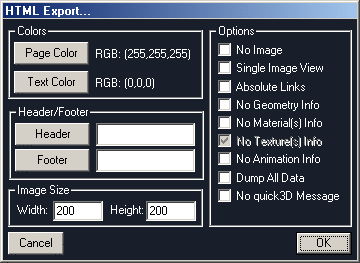
To save an HTML file, select Export HTML... from the
File menu. After selecting the filename and path to save as,
quick3D's HTML export dialog will appear (see Figure
1.1). When the source model does not contain certain
information, the corresponding option is disabled. In Figure 2.1,
the model contains no animation data. Below are explanations of all
the options contained in this dialog.
 Figure 1-1
HTML Export Dialog Window Page Color
Use this button to select a color for the destination page's
background. This is ignored if a header file is specified in which
a BODY tag is used.
Text Color
Use this button to select a color for the destination page's text.
This is ignored if a header file is specified in which a BODY tag
is used.
Header
Use this button to select a file to use as a header for the
destination HTML file.
Footer
Use this button to select a file to use as a footer for the
destination HTML file.
Width
In pixels, the width of the preview image(s). This is disabled if
No Image is selected.
Height
In pixels, the height of the preview image(s). This is disabled if
No Image is selected.
No Image
When selected, no preview image(s) will be included on the
destination page.
Single Image View
When selected, only one preview image (the current display) will
be used. By default, quick3D generates 6 logical previews of the
model, from different orientations.
Absolute Links
When selected, absolute file paths are used for links. By default,
relative links are used.
No Geometry Info
When selected, general geometric information about the model is
withheld from the destination page.
No Material(s) Info
When selected, the source model's material information is withheld
from the destination page.
No Textures(s) Info
When selected, the source model's texture information is withheld
from the destination page.
No Animation Info
When selected, the source model's animation information is
withheld from the destination page.
Dump All Data
When selected, all the necessary information to re-create the
model is dumped to the destination page. This includes all the
vertex and polygon raw data.
No quick3D Message
When selected, the quick3D message is not placed on the
destination page.
1.2 - Other File Operations
To see information on the currently opened file, you can display
the File Info Window by selecting Show 3D File Info... from
the File menu. This window behaves just like the File
Browser, and displays information stored in the file that is not
evident in the display.
The current display can also be printed. To do this, select
Export To Printer. from the File menu. |
 |
|


